Writing Your First Application
Note
If you’re not yet familiar with the fundamental architecture of a Fabric network, you may want to visit the Introduction and Building Your First Network documentation prior to continuing.
In this section we’ll be looking at two sample applications to see how Fabric apps work. These apps (and the smart contract they use) – collectively known as “Fabcar” – involve querying a ledger that has been pre-populated with cars and then updating that ledger to add new cars and to change car owners.
We’ll go through three principle steps:
1. Setting up a development environment. Our application needs a network to interact with, so we’ll download one stripped down to just the components we need to run queries and updates:
2. Learning the parameters of the sample smart contract our app will use. Our smart contract contains various functions that allow us to interact with the ledger in different ways. We’ll go in and inspect that smart contract to learn about the functions our applications will be using.
3. Developing the applications to be able to query and update Fabric records. We’ll get into the app code itself (our apps have been written in Javascript) and manually manipulate the variables to run different kinds of queries and updates.
After completing this tutorial you should have a basic understanding of how an application is programmed in conjunction with a smart contract to interact with the ledger on a Fabric network. All in about 30 minutes.
First, let’s get our network and our apps...
Setting up a Development Environment
Visit the Prerequisites page and ensure you have the necessary dependencies installed on your machine.
Also, let’s remove any containers and chaincode (smart contracts run on chaincode) images you might have running to ensure you don’t have a port conflict or Docker issue.
First, remove the containers:
docker rm -f $(docker ps -aq)
Next, delete the chaincode image:
docker rmi dev-peer0.org1.example.com-fabcar-1.0
Now that your machine is set up, navigate to a directory where you want the samples downloaded to and issue the clone command:
git clone https://github.com/hyperledger/fabric-samples.git
This command will create a directory, fabric-samples (in which multiple
samples and tutorial apps have now been downloaded), and a specific
subdirectory, fabcar.
Enter that directory:
cd fabric-samples/fabcar
Now take a look at what’s inside your fabcar directory.
ls
You should see the following:
creds invoke.js package.json query.js startFabric.sh
Use the startFabric.sh script to launch the network. This script downloads
and extracts the Fabric docker images, so it will take a few minutes to
complete:
./startFabric.sh
One last thing. We need to install the SDK (software development kit) node modules:
npm install
Alright, now that you’ve got a sample network and some code, let’s take a look at how the different pieces fit together.
How Applications Interact with the Network
For a more in-depth look at the components in our Fabcar network (and how they’re deployed) as well as how applications interact with those components on more of a granular level, click Understanding the Fabcar Network.
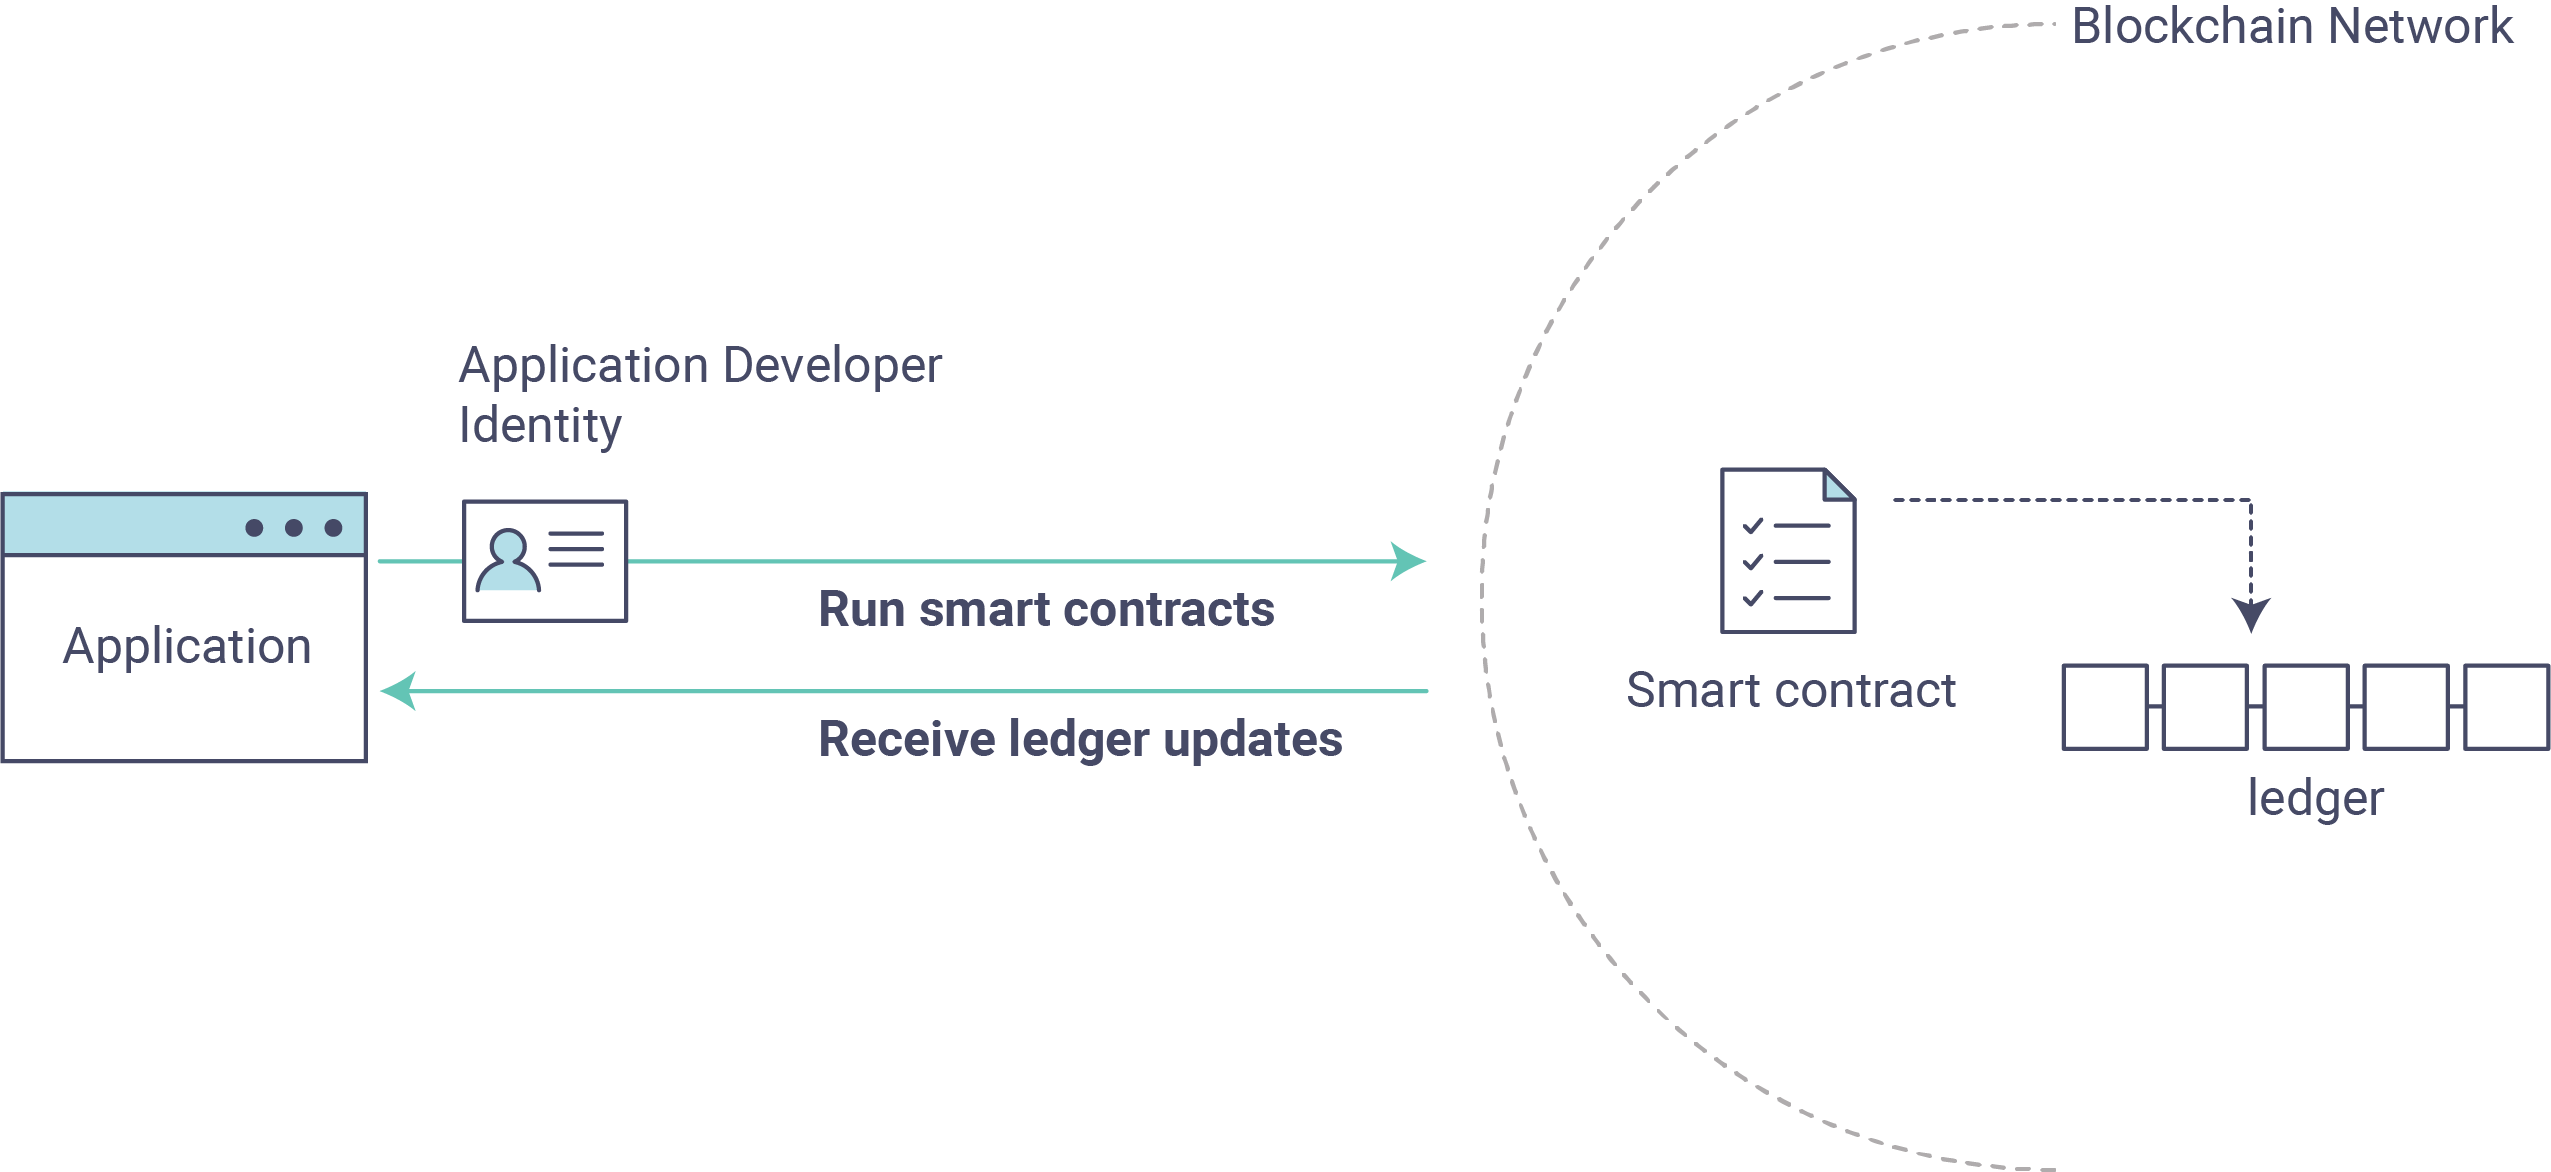
Developers more interested in seeing what applications do – as well as looking at the code itself to see how an application is constructed – should continue. For now, the most important thing to know is that applications use a software development kit (SDK) to access the APIs that permit queries and updates to the ledger.
Querying the Ledger
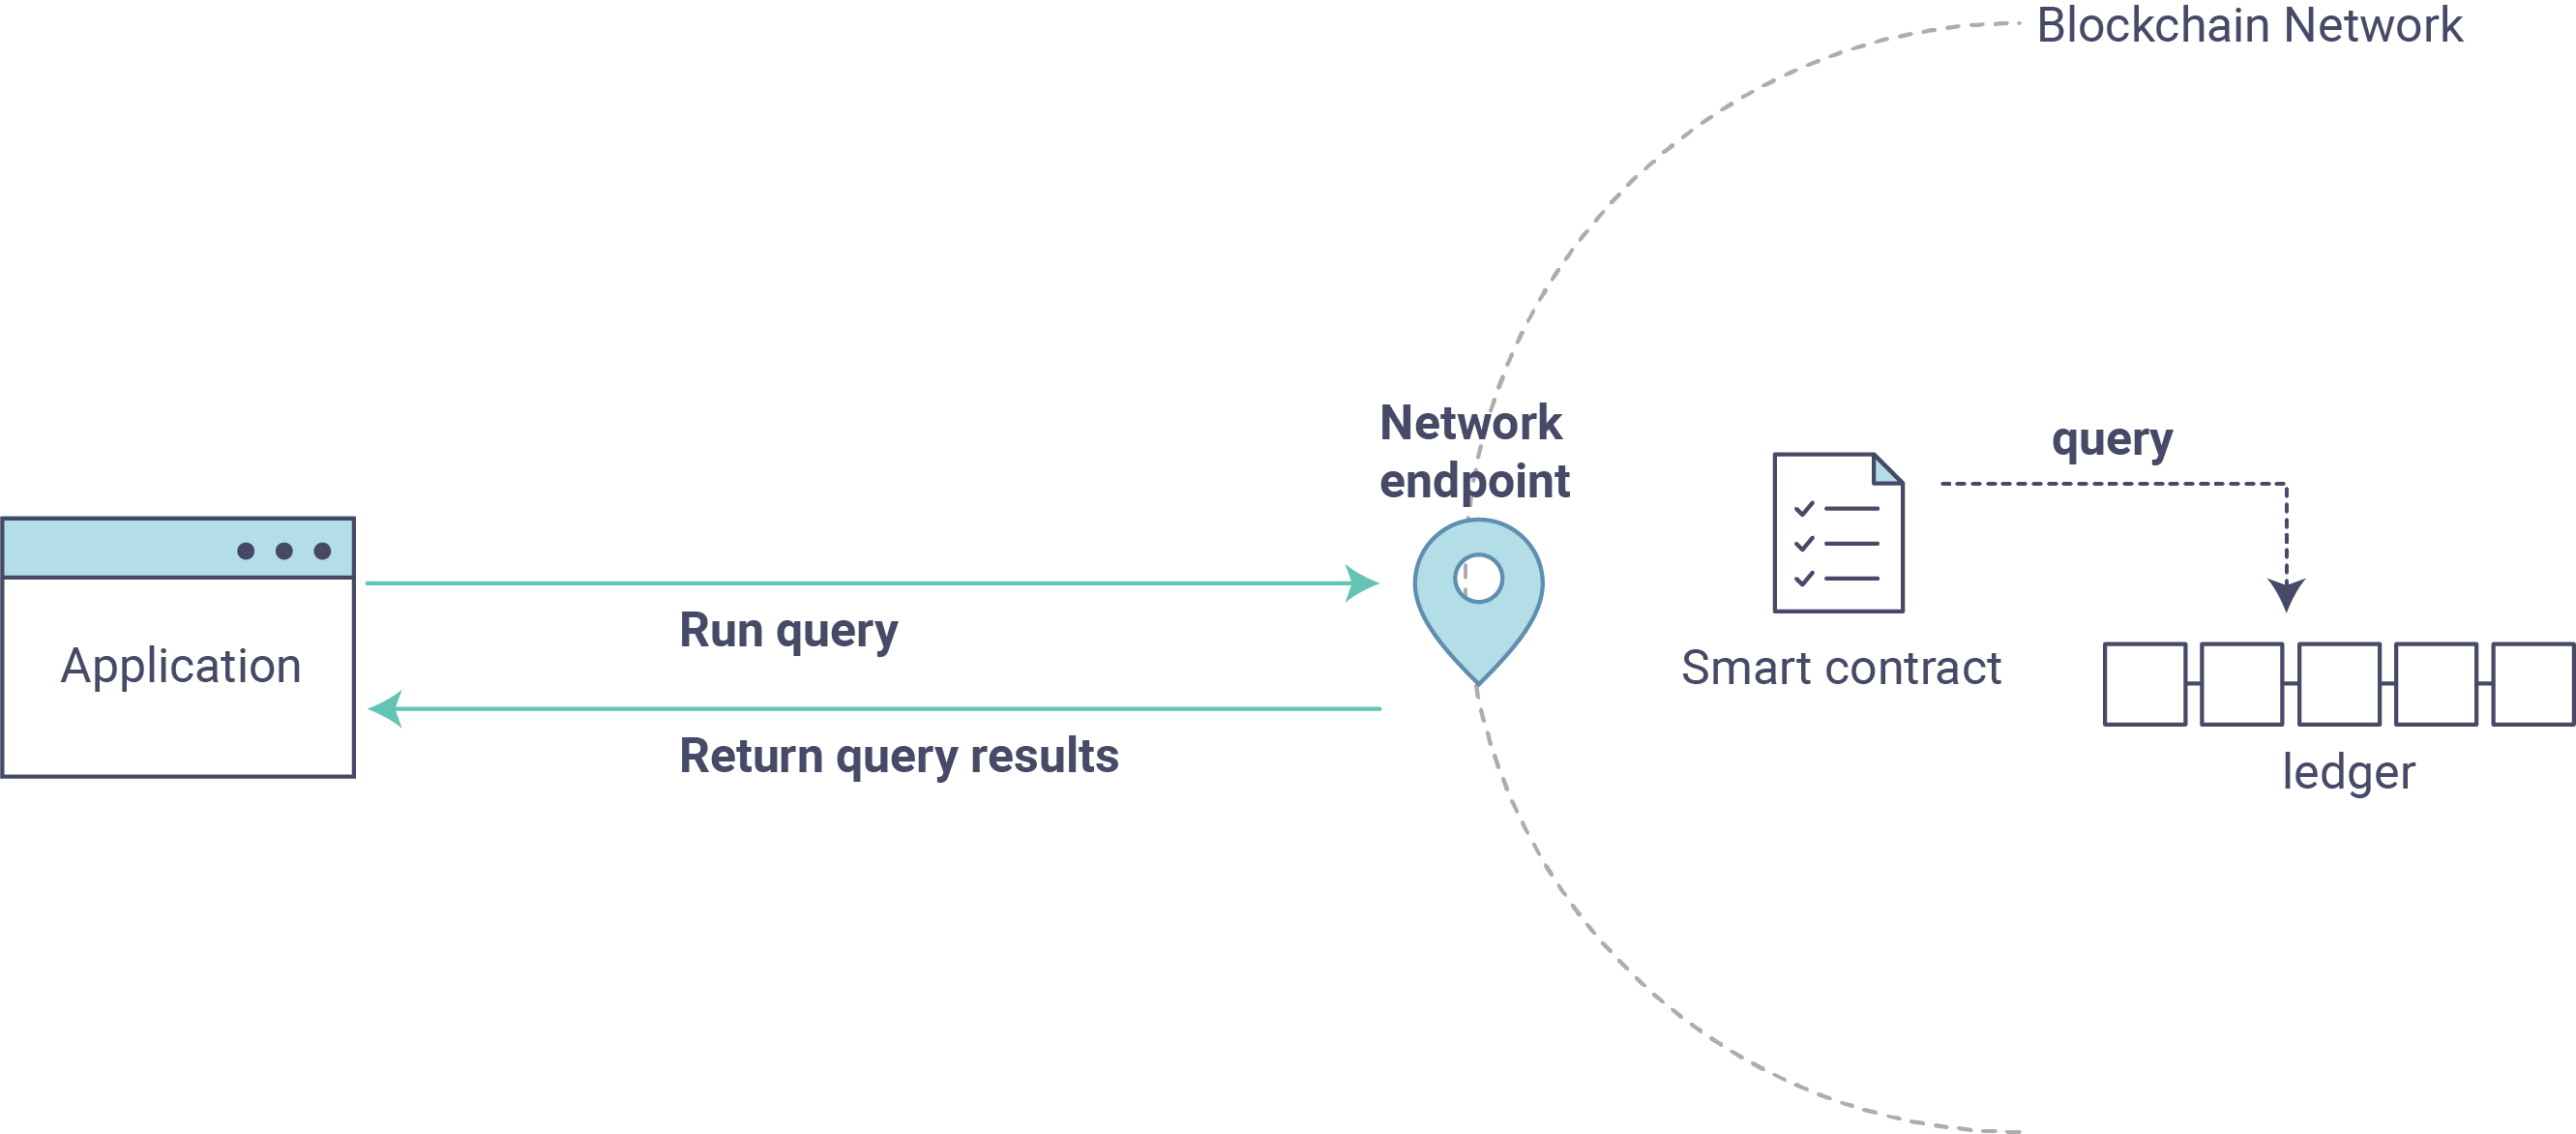
Queries are how you read data from the ledger. This data is stored as a series of key/value pairs, and you can query for the value of a single key, multiple keys, or – if the ledger is written in a rich data storage format like JSON – perform complex searches against it (looking for all assets that contain certain keywords, for example).
This is a representation of how a query works:
Note
You will issue all subsequent commands from the fabcar directory.
First, let’s run our query.js program to return a listing of all the cars on
the ledger. A function that will query all the cars, queryAllCars, is
pre-loaded in the app, so we can simply run the program as is:
node query.js
It should return something like this:
Query result count =  1
Response is  [{"Key":"CAR0", "Record":{"colour":"blue","make":"Toyota","model":"Prius","owner":"Tomoko"}},
{"Key":"CAR1",   "Record":{"colour":"red","make":"Ford","model":"Mustang","owner":"Brad"}},
{"Key":"CAR2", "Record":{"colour":"green","make":"Hyundai","model":"Tucson","owner":"Jin Soo"}},
{"Key":"CAR3", "Record":{"colour":"yellow","make":"Volkswagen","model":"Passat","owner":"Max"}},
{"Key":"CAR4", "Record":{"colour":"black","make":"Tesla","model":"S","owner":"Adriana"}},
{"Key":"CAR5", "Record":{"colour":"purple","make":"Peugeot","model":"205","owner":"Michel"}},
{"Key":"CAR6", "Record":{"colour":"white","make":"Chery","model":"S22L","owner":"Aarav"}},
{"Key":"CAR7", "Record":{"colour":"violet","make":"Fiat","model":"Punto","owner":"Pari"}},
{"Key":"CAR8", "Record":{"colour":"indigo","make":"Tata","model":"Nano","owner":"Valeria"}},
{"Key":"CAR9", "Record":{"colour":"brown","make":"Holden","model":"Barina","owner":"Shotaro"}}]
These are the 10 cars. A black Tesla Model S owned by Adriana, a red Ford Mustang
owned by Brad, a violet Fiat Punto owned by Pari, and so on. The ledger is
key/value based and in our implementation the key is CAR0 through CAR9.
This will become particularly important in a moment.
Now let’s see what it looks like under the hood (if you’ll forgive the pun).
Use an editor (e.g. atom or visual studio) and open the query.js program.
The initial section of the application defines certain variables such as chaincode ID, channel name and network endpoints. In our sample app, these variables have been baked-in, but in a real app these variables would have to be specified by the app dev.
var options = {
    wallet_path: path.join(__dirname, './network/creds'),
    user_id: 'PeerAdmin',
    channel_id: 'mychannel',
    chaincode_id: 'fabcar',
    network_url: 'grpc://localhost:7051',
};
This is the chunk where we construct our query:
// queryCar - requires 1 argument, ex: args: ['CAR4'],
// queryAllCars - requires no arguments , ex: args: [''],
const request = {
      chaincodeId: options.chaincode_id,
      txId: transaction_id,
      fcn: 'queryAllCars',
      args: ['']
};
When the application ran, it invoked the fabcar smart contract, ran the
queryAllCars function within it, and passed no arguments to it.
To take a look at the available functions within our smart contract, navigate
to the chaincode subdirectory and open fabcar.go in your editor. You’ll
see that we have the following functions available to call: initLedger,
queryCar, queryAllCars, createCar, and changeCarOwner.
Let’s take a closer look at the queryAllCars function to see how it
interacts with the ledger.
func (s *SmartContract) queryAllCars(APIstub shim.ChaincodeStubInterface) sc.Response {

     startKey := "CAR0"
     endKey := "CAR999"

     resultsIterator, err := APIstub.GetStateByRange(startKey, endKey)
This defines the range of queryAllCars. Every car between CAR0 and
CAR999 – 1,000 cars in all, assuming every call has been tagged properly
– will be returned by the query.
Below is a representation of how an app would call different functions in
chaincode, showing the various APIs – createCar, queryallCars, etc –
available to use.
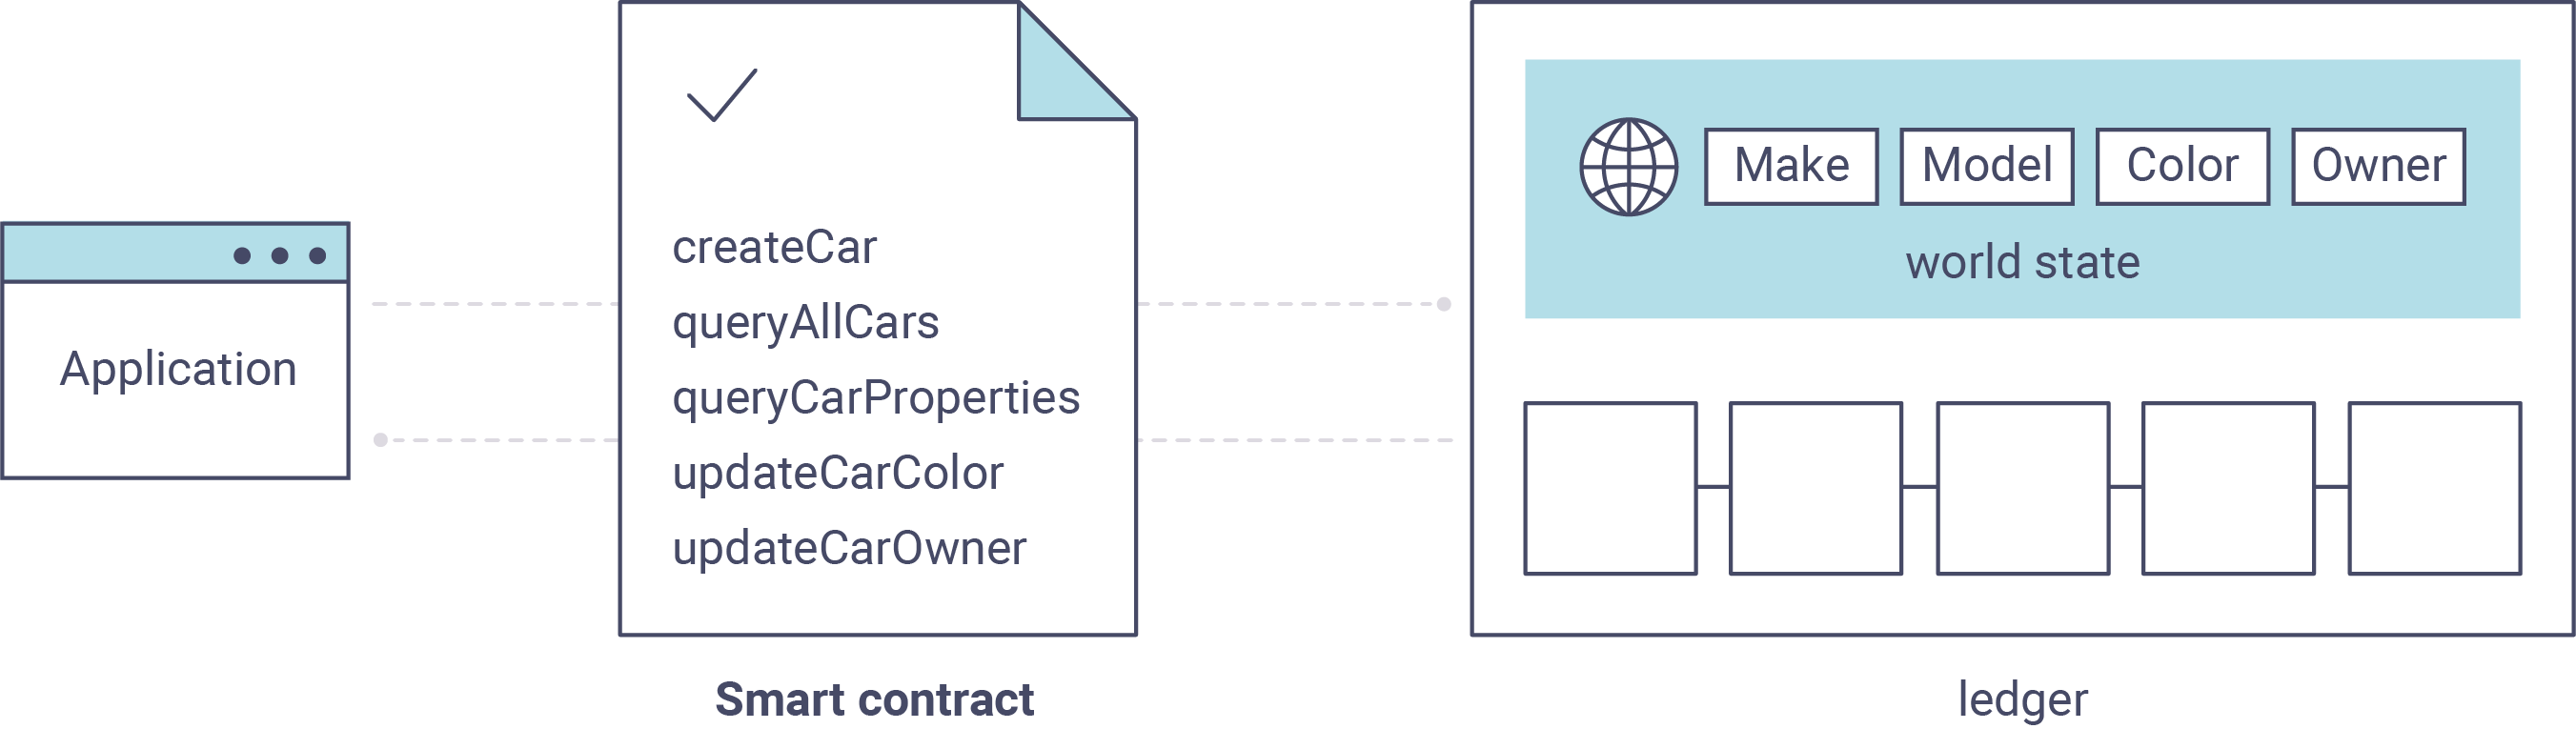
We can see our queryAllCars function, as well as one called createCar,
that will allow us to update the ledger and ultimately append a new block to
the chain in a moment.
But first, go back to the query.js program and edit the constructor request
to query CAR4. We do this by changing the function in query.js from
queryAllCars to queryCar and passing CAR4 as the specific
“argument” (or “key”).
query.js should now look like this:
const request = {
      chaincodeId: options.chaincode_id,
      txId: transaction_id,
      fcn: 'queryCar',
      args: ['CAR4']
};
Save the program and navigate back to your fabcar directory. Now run the
program again:
node query.js
You should see the following:
{"colour":"black","make":"Tesla","model":"S","owner":"Adriana"}
If you go back and look at the result from when we queried every car before, you can see that CAR4 was Adriana’s black Tesla model S, which is the result that was returned here.
Using the queryCar function, we can query against any key (e.g. CAR0)
and get whatever make, model, color, and owner correspond to that car.
Great. At this point you should be comfortable with the basic query functions in the smart contract and the handful of parameters in the query program. Time to update the ledger...
Updating the Ledger
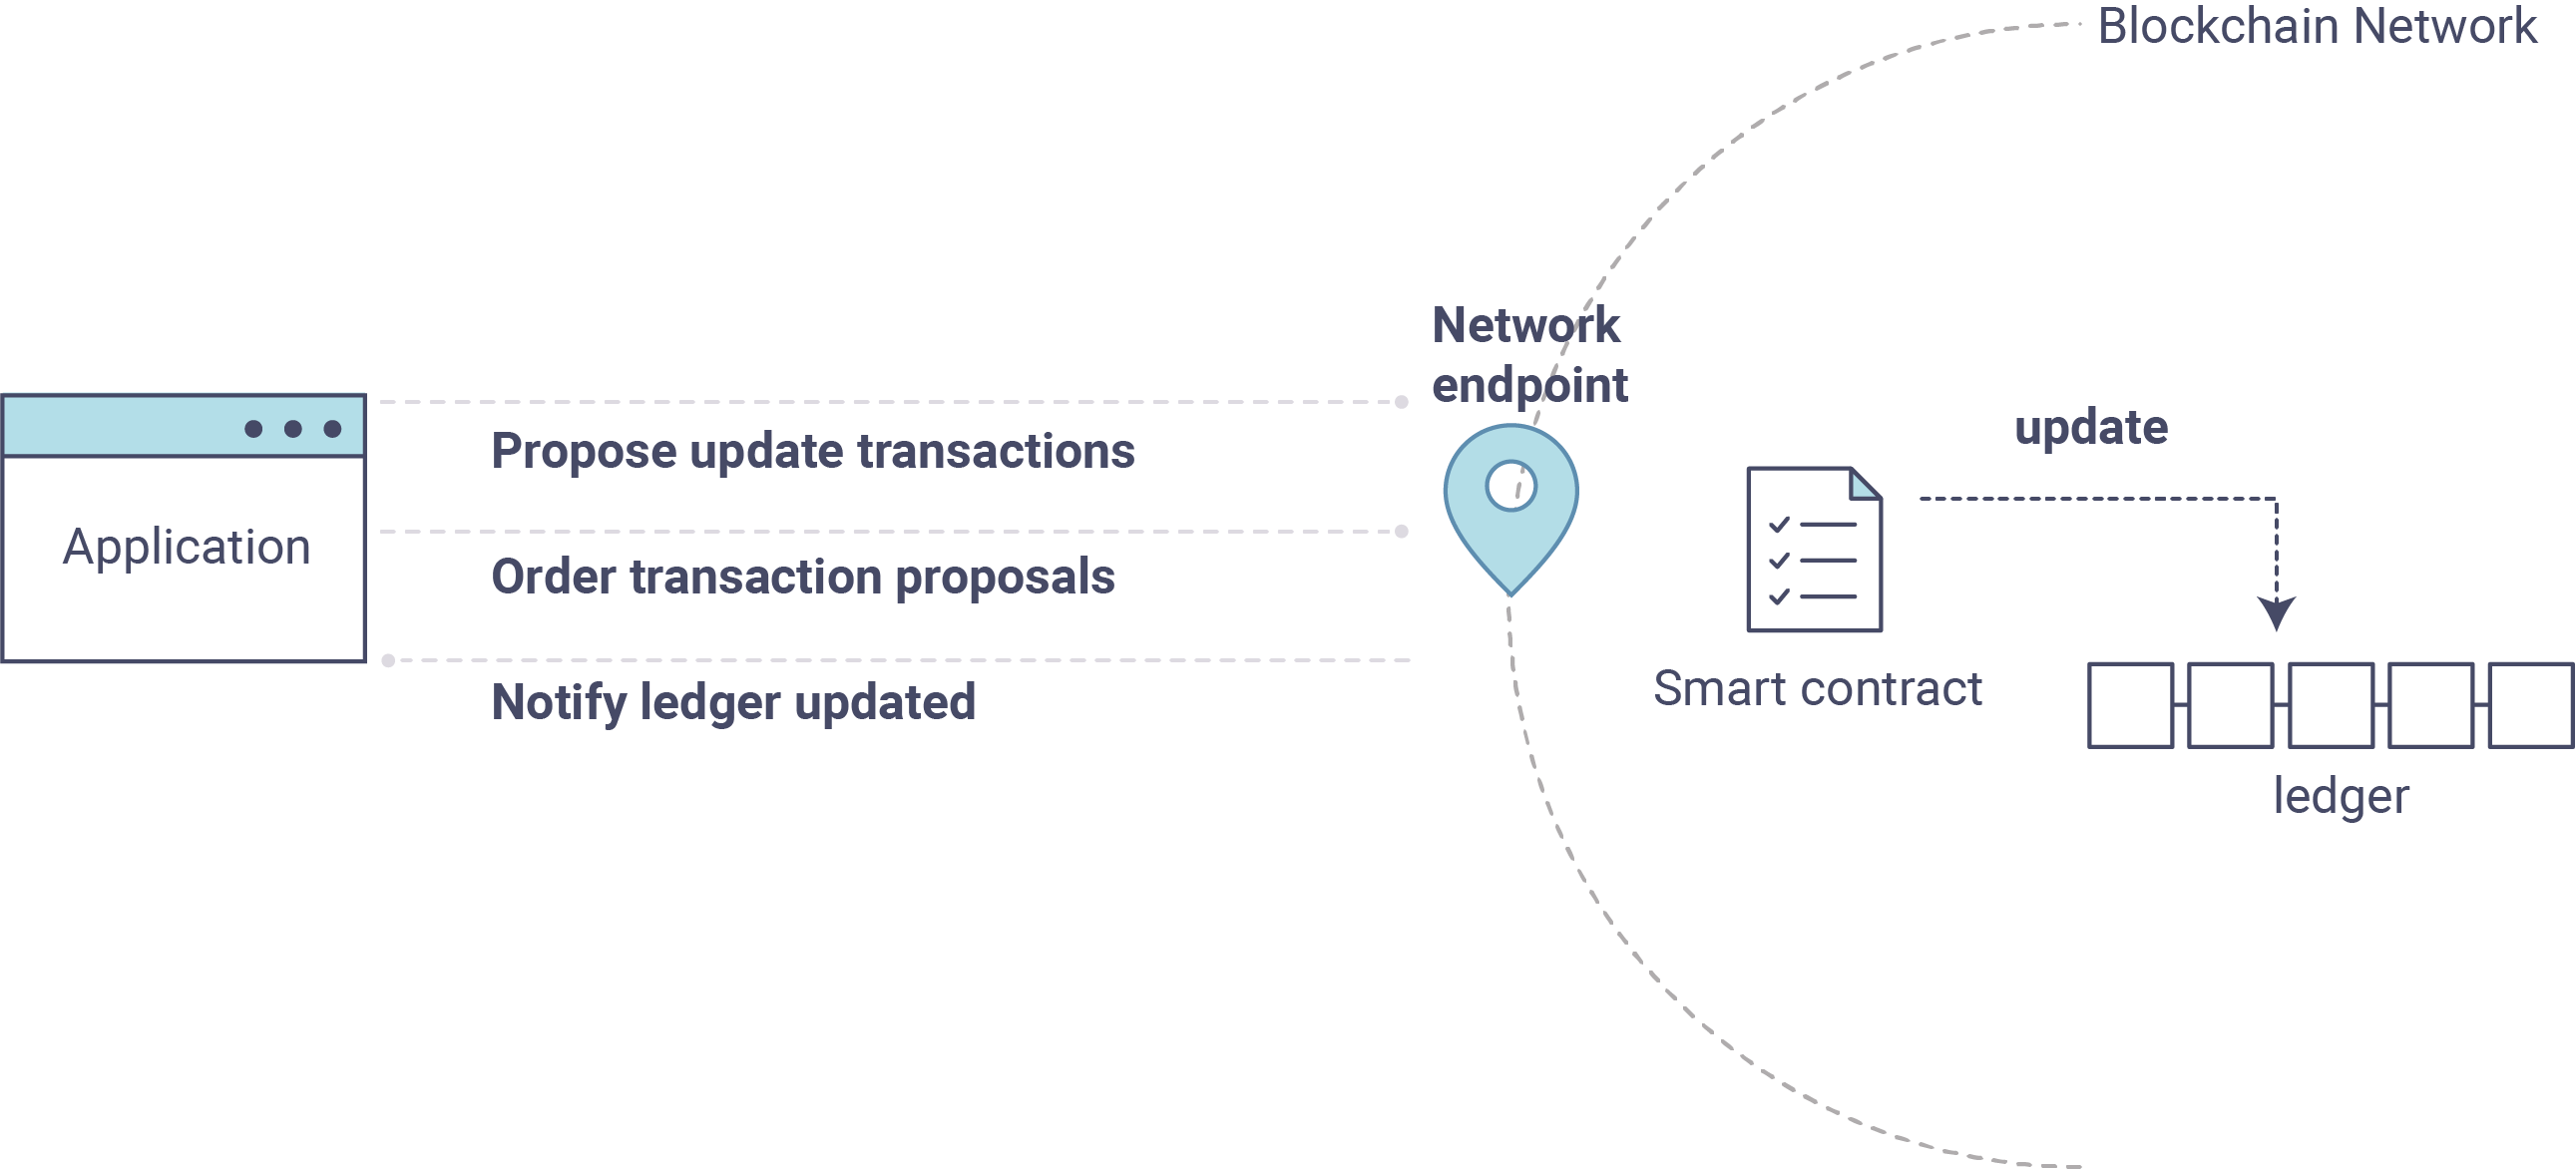
Now that we’ve done a few ledger queries and added a bit of code, we’re ready to update the ledger. There are a lot of potential updates we could make, but let’s start by creating a car.
Below we can see how this process works. An update is proposed, endorsed, then returned to the application, which sends it to be ordered and written to the ledger:
Our first update to the ledger will be to create a new car. We have a separate
Javascript program – invoke.js – that we will use to make updates. Just
as with queries, use an editor to open the program and navigate to the
codeblock where we construct our invocation:
// createCar - requires 5 args, ex: args: ['CAR11', 'Honda', 'Accord', 'Black', 'Tom'],
// changeCarOwner - requires 2 args , ex: args: ['CAR10', 'Barry'],
// send proposal to endorser
var request = {
    targets: targets,
    chaincodeId: options.chaincode_id,
    fcn: '',
    args: [''],
    chainId: options.channel_id,
    txId: tx_id
};
You’ll see that we can call one of two functions - createCar or
changeCarOwner. First, let’s create a red Chevy Volt and give it to an
owner named Nick. We’re up to CAR9 on our ledger, so we’ll use CAR10
as the identifying key here. Edit this codeblock to look like this:
var request = {
    targets: targets,
    chaincodeId: options.chaincode_id,
    fcn: 'createCar',
    args: ['CAR10', 'Chevy', 'Volt', 'Red', 'Nick'],
    chainId: options.channel_id,
    txId: tx_id
};
Save it and run the program:
node invoke.js
There will be some output in the terminal about Proposal Response and Transaction ID. However, all we’re concerned with is this message:
The transaction has been committed on peer localhost:7053
To see that this transaction has been written, go back to query.js and
change the argument from CAR4 to CAR10.
In other words, change this:
- const request = {
- chaincodeId: options.chaincode_id, txId: transaction_id, fcn: ‘queryCar’, args: [‘CAR4’]
};
To this:
const request = {
      chaincodeId: options.chaincode_id,
      txId: transaction_id,
      fcn: 'queryCar',
      args: ['CAR10']
};
Save once again, then query:
node query.js
Which should return this:
Response is {"colour":"Red","make":"Chevy","model":"Volt","owner":"Nick"}
Congratulations. You’ve created a car!
So now that we’ve done that, let’s say that Nick is feeling generous and he wants to give his Chevy Volt to someone named Barry.
To do this go back to invoke.js and change the function from createCar
to changeCarOwner and input the arguments like this:
var request = {
    targets: targets,
    chaincodeId: options.chaincode_id,
    fcn: 'changeCarOwner',
    args: ['CAR10', 'Barry'],
    chainId: options.channel_id,
    txId: tx_id
};
The first argument – CAR10 – reflects the car that will be changing
owners. The second argument – Barry – defines the new owner of the car.
Save and execute the program again:
node invoke.js
Now let’s query the ledger and see that it’s been updated to reflect this:
node query.js
It should return this result:
Response is {"colour":"Red","make":"Chevy","model":"Volt","owner":"Barry"}
The ownership of CAR10 has been changed from Nick to Barry.
Summary
Now that we’ve done a few queries and a few updates, you should have a pretty good sense of how applications interact with the network. You’ve seen the basics of the roles smart contracts, APIs, and the SDK play in queries and updates and you should have a feel for how different kinds of applications could be used to perform other business tasks and operations.
In subsequent documents we’ll learn how to actually write a smart contract and how some of these more low level application functions can be leveraged (especially relating to identity and membership services).
Additional Resources
The Hyperledger Fabric Node SDK repo is an excellent resource for deeper documentation and sample code. You can also consult the Fabric community and component experts on Hyperledger Rocket Chat.